Adobe Dehaze Tool – A Boon to Photography Industry
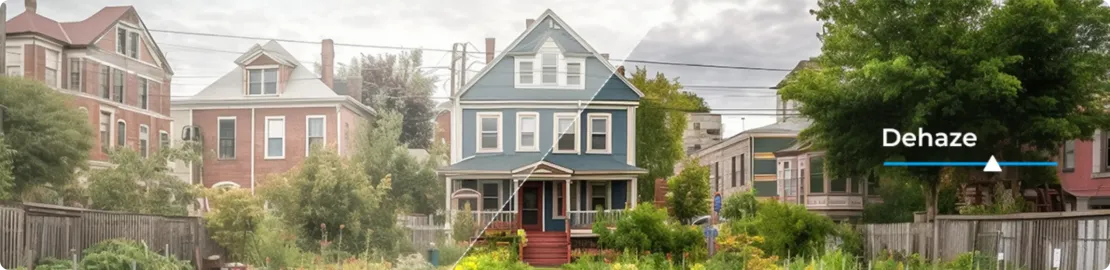
The significant Dehaze tool from Adobe for Photoshop’s Adobe Camera Raw and Lightroom is blazing a trail. As the name suggests, “Dehaze” is the Creative Cloud update altogether, that helps in reducing atmospheric fog and haze from images resulting in clear pictures. It can also be applied to add haze to an image. Dehaze helps in adjusting the tone curves, shapes, and vignetting effects.
According to Adobe, the Dehaze technology is built on the theory of transmission of light. The tool estimates the loss of light due to absorption and scattering into the atmosphere, which evokes a scene analysis at a level. In fact, it takes an expert to fully harness the power of this feature.
-
Get Start Now!
- Contact Us
- Chat Us
- Email Us
- Call Us
Dehaze in Photography
Haze in images is the consequence of atmospheric conditions like fog, ultra-violet rays, and environmental factors like pollution. Photographers generally prefer to see pictures in their finest and purest forms that we can commonly find in nature, landscape, wildlife, wedding photography, etc. However, haze dampens the essence of the image in the form of unclear images, ruining the photography chores. Photographers are often found to cancel their outdoors and go back to the drawing boards.
Adobe Dehaze technology is the messiah for the photographers. The objectives of the tool are to:
- Aid the post production workflow.
- Restore the details in the image along with the existing haze which may include color correction of the sky, objects, sky as the original.
With close similarity with tools like Clarity, Dehaze is appropriate for restoring landscape images where the background details fade away due to haze.
-
Get Start Now!
- Contact Us
- Chat Us
- Email Us
- Call Us
Need for Adobe Dehaze Tool
It is an annoying fact to photographers when their utter enthusiasm of capturing images as it is, looks bizarre while printing. The reasons can be fog, mist, pollution, and even dust spots on the sensor. These are subtle noises which are invisible on screen but lead to dull and marred images.
This is where the Adobe Dehaze tool plays a vital role.
- It magnifies the optical flaws which can be used to get a positive outcome.
- Dehaze cuts the luminescence caused by the noise and brings the background detail back into the frame.
The below image is an example of a situation where the use of Dehaze corrected the image restoring the image details:
The Dehaze adjustment helped in adding the mountain range in the background, which was quite unclear in the original image. Moreover, it added saturation to the sky.
What is Adobe Dehaze Tool Capable of Doing?
Dehaze works wonder for images where the details in the background are to be restored. However, if the background is beyond the focal plane, Dehaze will not be able to bring the details back. The comparison of images below shows what Dehaze can do to enhance an image:
The most amazing aspect of Dehaze is that the slider moves both ways, i.e., from the original haze shot to dehaze and can again add haze based on the photography goals.
Dehaze in Adobe Photoshop
Among one of the many reasons behind upgrading Photoshop CC to a newer version is the addition of the Adobe Dehaze tool. However, why has the tool gained such importance in the post production procedure? Let’s refer to the below image to understand:
In the above image, there is a huge presence of haze/fog in the background. However, the image can’t be shot in another day or a different setting since it’s the marriage ceremony. Discarding the image is just a click away, but there are still easy ways to recover the image from the noise using the Dehaze tool in Photoshop.
The “after” image is the portrayal of restoring the details of the image through Dehaze in Photoshop without missing out on the beautiful memory. Although Photoshop was already equipped with such functionality for a long time, the procedure was extremely time-consuming, which is unsuitable when it comes to editing a huge number of images professionally.
Adobe photoshop dehaze is an advancement for professional photographers. Days are gone when photography schedules were canceled due to fog, mist, and more. Shots taken irrespective of place and time are adjustable and can be restored with the original background details just in no time.
The aerial view of the earth in the below image has atmospheric distractions. The Adobe Dehaze tool enhanced the quality of the image, removing the fog and restoring the background.
The introduction of the Dehaze tool in Adobe Photoshop has revolutionized how photographers handle hazy images. To dehaze in Photoshop, this tool is used to eliminate any atmospheric interference, such as fog or mist, and restore the image to its original clarity. This feature can be found in the 'Effects' panel, under a slider named 'Dehaze'. By moving the slider to the right or left, the user can increase or decrease the amount of haze removal, respectively.
For example, in a photo of a mountain range obscured by haze, using the Dehaze tool can significantly enhance the details of the mountains, making them stand out. Similarly, the Lightroom Dehaze tool works on the same principle and can be used to remove haze from photos with ease. This tool is located in the 'Develop' module of Lightroom under the 'Effects' panel.
How to Use Dehaze in Photoshop
Dehaze is a part of Adobe Camera RAW adjustments and is easy to use.
- Select an image
- Duplicate it with command CTRL+J. The duplicate copy is now the active layer.
- Click on Filter and go to Camera RAW Filter
- Locate the Effect tab and access the Dehaze option.
- In the Dehaze tab, going too much on the left side will increase the haze, and more on the right side will bring an unnatural look to the image.
Dehaze adjustments must be perfect to which brightness, clarity, and exposure must be proportionately altered to get the best results.
Let’s go through a few examples to get a clear understanding of Dehaze effects:
Dehaze in Photoshop Scenario 1
The above image shows the application of Dehaze in Photoshop and its better outcome.
Dehaze in Photoshop Scenario 2
Another example where there is an absolute need for De-hazing:
The image of a blizzard is restored through Adobe Dehaze tool where the mountain, the sky, and the house in the background is visible:
Dehaze in Photoshop Scenario 3
In the following image, we can see that the rainbow is invisible in the original picture:
The application of Adobe Photoshop Dehaze helped the rainbow, the sky, and the original color to be visible.
Adobe Lightroom CC Dehaze Tool
The Dehaze in Adobe Lightroom is among the most dynamic and functional tools having the capability of creating far beyond what curves and clarity sliders in Lightroom can do. It creates robust images revealing the hidden details that one cannot view with their own eyes while capturing the photo. The global tool adds saturation to the whole picture; however, the dehaze effects can be applied locally with adjustment brush or the graduated filter tool.
Adobe Lightroom CC Dehaze Tool is also operated through pushing the slider right to reduce the haze and left to add it back, removing the contrast.
The image below shows the contrast between before and the image after applying the Dehaze effect.
When to Use Dehaze Slider
A Dehaze adjustment is a fancy tool that adds a fresh dimension to the entire post-photography work. The tool encompasses several other effects specifications that the Lightroom manages separately, for example, Vibrance, Clarity, Contrast, etc. Dehaze slider is an All-In-One tool that alters the intensity.
Dehazing Images with Lightroom
- Select an image and go to the Develop Tab
- Scroll down to find out the Dehaze slider
- Drag the slider to the right to remove the fogginess and to the left to add it.
- If you want to dehaze a particular area, select the Adjustment Brush, and edit the required area.
The below image has been edited using the Dehaze lightroom classic cc to get a clear picture.
Here are some examples where the Dehaze Slider plays a vital role:
Dehaze in Lightroom Scenario 1
It helps with noise reduction. Black and white photos require the contrast adding to one tone. Moreover, the presence of middle grey gives a boring look to the image; rather, a gradient grey looks enhancing. The Adobe Lightroom CC Dehaze Tool adds contrast to the large middle grey patches.
Dehaze in Lightroom Scenario 2
In winter, condensation on the camera lens is found which can be reflected in images if the lens is not cleared before clicking. Dehaze slider helps in removing it.
Dehaze in Lightroom Scenario 3
The Adobe Dehaze tool removes the haze in distant landscape images.
Dehaze Your Precious Moments with SmartPHOTOeditors
De-hazing should be just perfectly applied with the correct ratio and balance with other effects. It can prove to be a little tricky if you are not fully aware of its effects. As part of our Photoshop services and Lightroom services, at SmartPHOTOeditors (SPE) we make use of the Dehaze tool to accomplish your photography goal as expected. Our photo editing experts use Adobe Lightroom CC Dehaze Tool, Adobe photoshop dehaze, and Dehaze lightroom classic cc to deliver the clean and naturally colored images you need. Contact us today to know more about our Dehazing services.
Similar Articles