Maybe you’ve had it up to here with your 9-5. Maybe you want to be your own boss. Or maybe, you just want to do what you really love, and get paid for it. Whatever your motivations are, you’ve decided to start a photography business. Great! But…now what?
Even if you know the ins and outs of your camera and can light a shot with the best of them, starting a photography business requires business skills as well as photography skills. Starting a photography business is not for the faint of heart—there are struggles; there are worries about where the next paycheck is going to come from. But there’s also the joy that comes from doing what you love, and the satisfaction that comes with overcoming a formidable challenge (and of course, writing your own paychecks).
Think you have what it takes? Every big challenge starts one small step at a time—so we’ve constructed a step by step guide to starting a photography business.
Step 1 – Evaluate Your Skills
Before you make photography your career path, it should be more than just a casual hobby. You should know the technical side of things, like manual modes, RAW, metering and focus modes. But you should also be familiar with the artistic side of things too, like composition and working with light.
Know a lot about photography? That’s great, but even great photographers can fail at a photography business. Why? This is because a photography business requires business knowledge too. Does the word marketing terrify you? Pick up a book on marketing for beginners. Are you horrible at managing numbers? Find a good accountant to turn for advice. Not the greatest communicator? Get ready to start a new habit of quickly responding to phone calls and emails. Identify what you do and don’t know about a business and do whatever it takes until those questions become background knowledge. Yes, some of it you’ll learn as you go, but it’s important enough that identifying what you have yet to learn deserves a spot as the very first step.
Step 2 – Find Your Niche
You want to start a photography business—but what kind of photography business? A portrait studio? A wedding photography business? Fine art print sales? Professional travel photography? Product photography?
Don’t start out thinking you’ll shoot whatever someone is willing to pay you to shoot—it’s better to excel at one or two areas than to be just okay in several areas. Start by evaluating what you enjoy photographing. And since it’s both an art and a business, consider what your style meshes well with too.
The key is to narrow down an area you can excel in—but not to narrow it down too much. Too narrow, and there may not be enough work in your area to maintain a successful business. For example, if your niche is newborn photography, you could also offer maternity photos and first birthday sessions—which also open up additional possibilities for repeat clients.
Step 3 – Build a Portfolio
Every professional photographer needs a portfolio that showcases their past work as well as their style. Today, most photography portfolios are online. But what to do when you have no past work? How do you get a gig without a portfolio to even get started in the first place?
Getting started in photography is tough, getting started without a portfolio is nearly impossible. But of course, everyone starts somewhere—there are a few tricks to get started on your portfolio. One option is to work as a secondary shooter with an established photographer. Be sure to talk with the photographer ahead of time to make sure you’ll retain the right to use the images in your own portfolio, however.
While offering something for free doesn’t seem like a very good business strategy, many new photographers get their portfolios started by shooting for friends for free. Don’t think of it as a long term strategy, but simply a way to get your portfolio started. Once you get a small assortment of images for your portfolio, you don’t have to keep working for free (and you shouldn’t).
Most photography portfolios today are online (more about that in step nine). It’s also a good idea to have a printed album to take with you when meeting potential clients. Just be sure you have a few images to actually build a portfolio with.
Step 4 – Create a Name, and Register As a Business
Every business needs a name—it’s time to start brainstorming yours. Since photography businesses are often operated by a single person, many are based off of the photographer’s name. Others opt for something different entirely. Start by brainstorming, jotting down whatever comes to mind. Then, cross off the bad ideas, and rework the better ideas until you’re left with a few usable ideas.
Be sure to do a Google search to see if your potential business name is already in use. Also, check to see if yourbusinessname.com is already in use. Avoid using a name that’s the same or very similar to one that’s already in use.
Don’t save the necessary paperwork for the last minute. Most photography businesses are sole proprietorships, where there is one, exclusive owner. If you decide to use a sole proprietorship, you don’t need to register the business with your state, though some states require registration when you use a business name that is not your own. For specifics on your state, use this resource from the Small Business Association.
As a sole proprietorship, however, your personal assets are at risk in the event of a legal suit, or if you default on a business loan. If you choose to create an LLC, however, your personal assets are kept separate from your business—for example, if you take out a business loan as an LLC and default on it, the bank cannot reposes your house. An LLC usually has a small annual filing fee, however. Again, the filling requirements differ by state (Here is a good resource to see what your state’s requirements are). While the paperwork and cost varies by state, the LLC paperwork is usually just a few pages that are easy to fill out—you don’t have to pay an online legal company more to do it for you.
Once you’re clear with state paperwork, check your county clerk’s office for any additional requirements that may apply in your area. LLCs typically don’t register with the county, but single proprietorship businesses often do.
Step 5 – Talk Money
Don’t wait until tax season to start thinking about taxes for your business, or you may end up owing Uncle Sam more than you expected. Each scenario differs; however, based on where you live as well as other factors, so don’t rely on Google for accounting information. Find a reputable accountant and start a discussion on taxes early in the process of starting a photography business. Most accountants are happy to talk with you, knowing they’ll likely then receive your business when tax time rolls around. Ask how much to set aside for income taxes, as well as any other questions you may have on the financial side of getting your business set up.
It’s also a good idea to open a business bank account, to make tracking your business income and expenses easier. At the end of the month, check your bank statement and make note of the income and expenses for that month, then file it away until tax season.
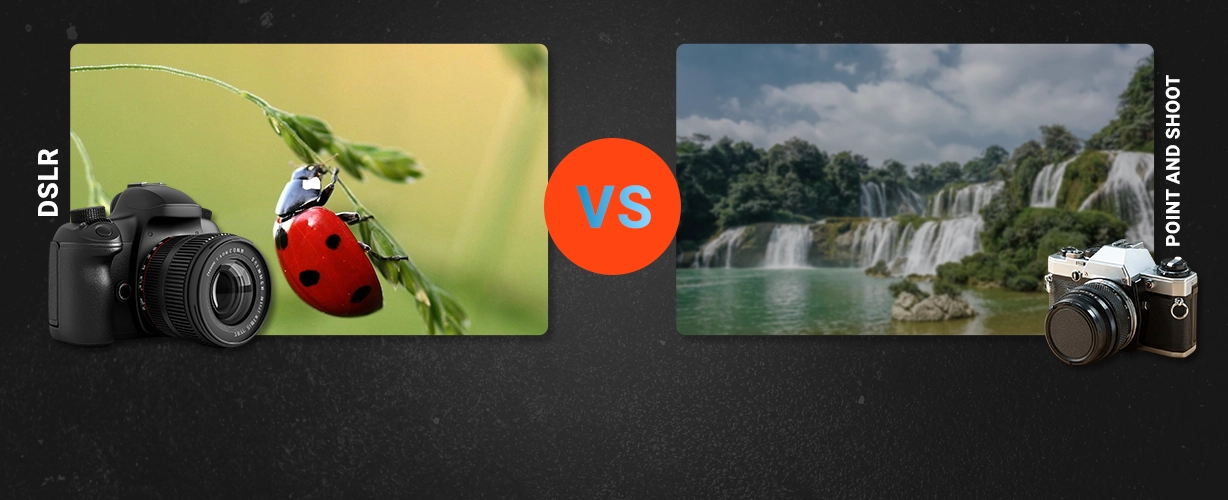
Step 6 – Evaluate Your Gear
A common mistake many new professional photographers make is buying too much gear, too quickly. Yes, there are certain things you’ll need for your business, but it’s also very easy to get caught up and spend too much. If you’re keeping your day job while you start your own photography business, you could set aside everything you earn with your photos to go towards your must-have gear list while you still have an income to live off of.
It goes without saying that every professional photographer needs a good camera—but what you shoot will determine the type of camera you’ll need. Not every professional photographer needs to drop $8,000 on a medium format camera. You should, however, have a DSLR or professional level mirrorless camera and a good image editing program (Photoshop and Lightroom together are now $10 a month), or you can outsource editing task to save time and focus on shooting. From there, the gear that you’ll need will depend on what you are shooting. A landscape photographer should have a good wide angle lens and a sturdy tripod, while a portrait photographer should have a good f/1.8 lens (50mm is a good length for portraits).
Make a list, and determine what is a must have, and what other items can be saved until you have a steady stream of income.
Step 7 – Consider Insurance
Speaking of gear, what would happen if someone stole your camera? Or your camera busted in the middle of a shoot? Your homeowner’s policy doesn’t cover business equipment (unless you adjust it to specifically say so). Get a quote on a business property insurance policy and weigh the costs of the insurance versus the cost of a new camera. If you have a basic DSLR and just a few lenses, the cost of the insurance may pay for a new camera in a year. But if you have, say, $10,000 worth of equipment, that really a risk you want to take?
Photographers should also consider general liability coverage. This type of policy covers legal expenses if, say, someone sues after your lighting equipment falls on their head, or after they trip inside your studio. General liability will also cover medical costs for the incident as well.
Some studios also invest in business interruption coverage. This type of insurance keeps your business afloat by replacing your income if, for example, the studio floods or burns down.
Be sure to look into insurance options and weight the risks before you officially open for business.
Step 8 – Set Your Prices
How much do I charge? A common question among new photographers, and a tough question to answer. But don’t get caught going uh, umm when a potential client asks how much you charge. Sit down and write out a price (or a few, depending on what you offer).
Here’s what you need to factor into your price:
- How much do you want to earn per hour?
- How much time does a photo shoot take, including the set-up, shooting, and post processing?
- How much time will you spend on non-billable business items, like marketing, updating your portfolio, and paperwork?
- What are your overhead costs (equipment, studio space, insurance, etc.)?
- How much would you like to save towards retirement and vacations? What about health insurance?
- Will you include prints, or charge for them separately? How much does it cost for each print?
Consider all of these factors and come up with a target rate. But, before you start advertising that price, consider one more thing:
What are other photographers in my area charging, and how much more experience do they have?
Don’t expect to charge more than a photographer with 30+ years of experience and still have enough clients to keep you busy. That target rate may have to be something you build towards as your portfolio grows. Keep your expectations realistic. To put things in perspective, the Bureau of Labor Statistics lists the median or average pay of photographers as $28,490 a year, or $13.70 an hour.
Step 9 – Get Online
Today, for most potential customers, if you’re not online, you don’t exist. And for the most part, that’s true—so getting online is an essential step in starting a photography business. Start a website and include at least your portfolio, an about section, and contact information. Many photographers also choose to list their prices online too.
There are many ways to build a website—and thankfully, you don’t have to be a computer guru to start a website. There are many good web design platforms out there. There’s options designed specifically for photographers, like Photoshelter, or options for any small business owner like Squarespace.
It’s also a good idea to consider adding an online ordering gallery to your website—many customers are coming to expect such a feature, particularly for weddings and senior portraits. The website builders that are designed specifically for photographers like Photoshelter often include an online ordering system. If your budget is small (which it probably is), there are options like Pixieset that offers a free monthly plan and instead takes a small commission on each sale—so if you don’t sell anything, you don’t pay anything.
Along with starting a website, it’s a good idea to get on social media too. Rather than have a small following on several social media outlets, focus instead on doing well with one. Facebook is a popular option, but there’s also Twitter, Instagram and others that can work well for photographers. If you’ve decided to start a wedding photography business, make sure to read our previous post on marketing ideas for wedding photographers.
Step 10 – A Little Bit More Paperwork
Before you head out to meet that potential client, be sure to have all your ducks…err, paperwork…in a row. Contracts help protect you legally, and also ensure that both you and the client are on the same page. There are a few different types of contracts; they vary a bit based on what you’re shooting.
Use a model release form if you are shooting images of a person for publication. This form establishes that you are indeed allowed to use that person’s image in a publication. (Download the Model Release form here)
An event photography contract spells out everything that’s to happen in an event. It establishes if there is a deposit, if that deposit is refundable, what’s to happen if the photographer is ill and can’t make it etc. (Download the Model Contract form here).
A photo release form simply states that you are giving your client permission to print the photos you took. Usually, this typically also includes a statement that establishes the photographer still owns the copyright to the images. (Download the photography release form)
Step 11 – Get the Word Out
Hopefully, you took our advice in step one and made sure to start digging in to the basics of marketing (if you weren’t familiar with them already). With a portfolio, website, prices and contracts in place, it’s time to put that knowledge to good use. No one is going to come to your photography business if they don’t know it exists. We put together a more complete list of marketing ideas (link to previous post), but here’s a few common tactics among new photographers:
Word of mouth – Start telling your friends. Give each customer a great experience, and they may tell their friends too.
Referral programs – To encourage more of that free word of mouth marketing, offer customers a referral bonus when they refer a friend, like a free 8×10 or a 10% discount on their next package.
Booth space – Go to where the customers are. If you shoot weddings, go to where the brides are—get a booth at the local bridal expo.
Business cards – Talk to someone about your business? Don’t expect them to remember the website address. Give them a business card.
Step 12 – Start Shooting—and Keep Them Coming Back For More
Whew! After all that work, you’re ready to start shooting (and not for free anymore). Be sure to prioritize customer experience to keep them coming back or to encourage them to refer a friend. You’re new at the whole business thing, so don’t be afraid to admit when you made a mistake and work to amend the problem.
Continue to work to spread the word, and continue to update your portfolio and website.
Conclusion
Starting a photography business is challenging task. You’ll wonder if you’ll make it at all. You may even start to wish for that 9 to 5 after a few too many weekend shoots. But, at the end of the day, you’re paid to do something you love doing—and that in itself is worth the challenge. There’s more to shooting professionally than just the photography—there’s marketing, paperwork and accounting to go along with it, just to name a few. Take it one step at a time, ask for help when you need it, and just keep shooting.
Are you ready to start your photography business? Bookmark or Pin this page to refer back to as you complete the steps, or sign up for our newsletter to receive more tips to your inbox.
– SmartPHOTOeditors
SmartPHOTOeditors
 Prev
Prev