Every portrait has a story. Good retouching brings out what is real instead of hiding it. People want honest images now. Real skin, real emotion, real personality. The old plastic look is no longer welcome.
LinkedIn found that profiles with a photo get up to 21 times more views and 9 times more connection requests. A strong portrait matters.
Modern portrait retouching blends art and technique. It keeps features natural and consistent while letting the person shine. In this guide, we walk through a full workflow from capture to final print and show how SmartPHOTOeditors can deliver this even at high volume.
What Makes Portrait Retouching Work
A good portrait edit keeps a person looking like themselves. It brings out their best features, protects real skin texture, and stays invisible so you notice the person, not the work behind it.
Editing has changed. It is no longer about hiding flaws, but about showing character and emotion. This kind of honest, natural portrait retouching matters even more when working with many faces.
Reports show that the global photo retouching service market, especially in portraits and photography, which was estimated at US$ 1.4 billion in 2024, is expected to reach US$ 3.5 billion by 2035.
With the growing demand for high-quality images, a strong workflow helps deliver portraits that feel real, personal, and professional, even on tight deadlines and large projects.
Why Traditional Editing Fails on Real Human Faces
Old editing methods used quick fixes in photography portraits, such as:
- Global blur-based “skin smoothing”
- Excessive contrast and saturation
- Uniform, artificial face structure
- Plastic-like skin with lost pores
- Inconsistent outputs in batches
Old editing methods made every face look the same. Skin became flat and fake, with no texture. It hid flaws, but it also removed personality. Research shows that heavily edited or filtered faces, especially on social media, negatively affect the viewers’ perception of attractiveness or self-esteem.
These shortcuts fall apart in close-up shots, high-resolution images, and large prints. Small mistakes become obvious, and people can sense when a face no longer looks real.
Advanced beauty retouching and photo polishing take a different path. It keeps the person true to themselves and gently guides the eye to what matters. The goal is not to hide someone, but to show them in their best light.
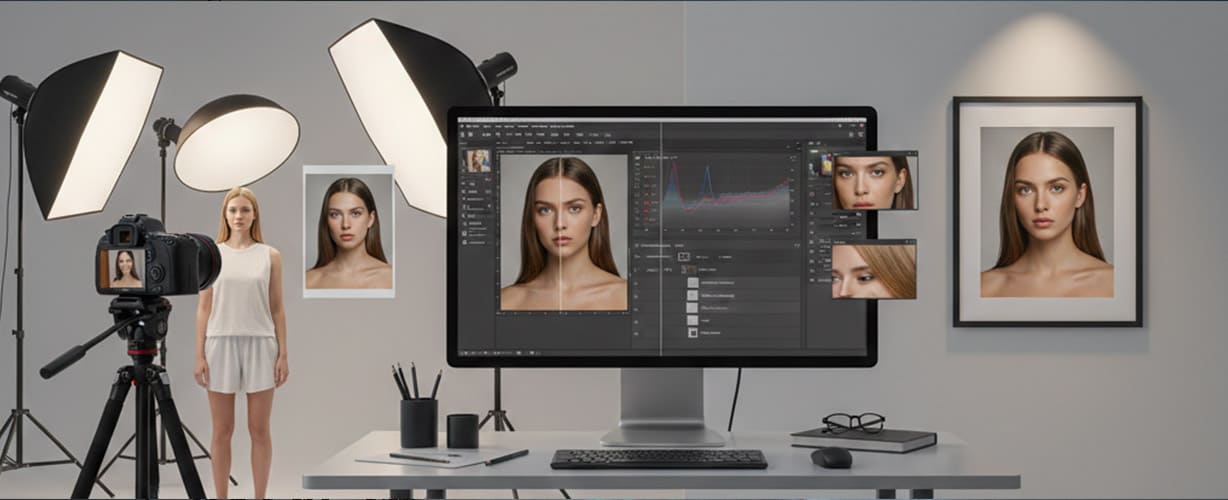
Portrait Retouching Workflow Stages: 6 Stages for Natural Photos at Scale
To keep portraits natural and consistent, each stage of editing needs its own place and purpose. Below is the core workflow for portrait editing from RAW to final image, which most professionals follow to bring out the true character in a face:
Stage 1: RAW capture and selection
Good retouching starts long before the edit. It begins during the shoot. RAW files keep the full range of light and detail, giving you more room to work later. Clean lighting and a simple background save time. Tethered shooting lets you catch issues right away.
After the shoot, import everything into Lightroom or Capture One. Flag the best shots, mark strong expressions, and apply basic settings to keep the set consistent. A little organization here saves hours later.
Stage 2: Basic adjustments
Before touching any small detail, fix the whole picture first. Adjust white balance so skin looks true. Set exposure and contrast to give the face shape and energy. Crop so the person feels present and centered. Fix any lens distortion or color fringing. Add a little clarity, but be careful to keep it off the skin.
These first steps build a clean foundation. This is where the image becomes steady and natural, ready for the finer work that follows.
Stage 3: Skin and blemish retouching
Now the real craft begins, i.e., subtle skin retouching and blemish removal. Use frequency separation or similar tools to even the skin tone while keeping the real texture. Remove little distractions in portrait photography, like small blemishes or dust spots. But do not remove the marks that make someone who they are. Freckles, dimples, scars, birthmarks. These are part of their story.
A simple checklist helps:
- Remove only what is temporary
- Keep the personality marks
- Texture comes first, tone comes second
The skin should still look like skin when you are done.
Stage 4: Wrinkles, clothing, hair, teeth, and glare
Once the main edits are done, it is time to tidy up the little things: wrinkles, hair edges, glare, and clothing folds. They may seem small, but they make a big difference in how professional the portrait feels. Here are simple, practical photography photo portrait checklists for each area, to help you finish strong.
Wrinkles
- Soften, do not erase. Age is part of a person
- Lift the darkest lines just a little to remove distraction
- Keep small expression lines around the eyes so the smile still feels real
- Zoom out often to make sure the face does not become flat
Clothing
- Smooth harsh folds but keep natural fabric flow
- Fix gaps in collars and sleeves that look messy
- Remove lint, logos, and dust spots
- Match exposure so clothing does not pull attention away from the face
Hair and flyaways
- Clean the hairline and remove stray hairs crossing the face
- Keep texture and volume. Avoid a “helmet” look
- Shape the edges near the shoulders for a neat outline
- Use soft masking and low-opacity brushes for believable results
Teeth
- Brighten only slightly. Healthy, not glowing
- Fix minor color stains without making teeth pure white
- Keep edges and small shadows to preserve depth
- If the smile is wide, check every tooth for even tone
Eyeglass glare
- Remove bright hotspots that cover the eyes
- Keep a tiny hint of reflection so glasses still look real
- Watch for warping or missing frame lines when cloning
- If possible, match light reflection in both lenses
Stage 5: Advanced enhancements
This is where skill and taste meet. Light in portrait photography shapes a face, whether at a vibrant, colorful family event or a simple black and white portrait photography shoot. A tiny correction with Liquify can refine the form, but go slowly. The eyes and hair can take a touch of sharpness to bring life. A little micro-contrast can add depth.
A good rule is simple. If you can see the edit clearly, it is too strong. Soften it a little. Less is almost always better.
Stage 6: Color grading and final output
It’s time to transform your portraits with color grading. Color sets the mood. You can use a LUT or grade by hand. Just keep the style consistent if you have many photos from the same session. Then export it in the right format for where the photo will live. sRGB works for the web. AdobeRGB or CMYK is better for print and big displays. Add sharpening for print only at the very end, and only what is needed for the viewing distance.
Before you finish, compare the final image to the original RAW. If your eyes jump to the editing, dial it back. The portrait should feel real, calm, and true. The person should shine, not the technique.
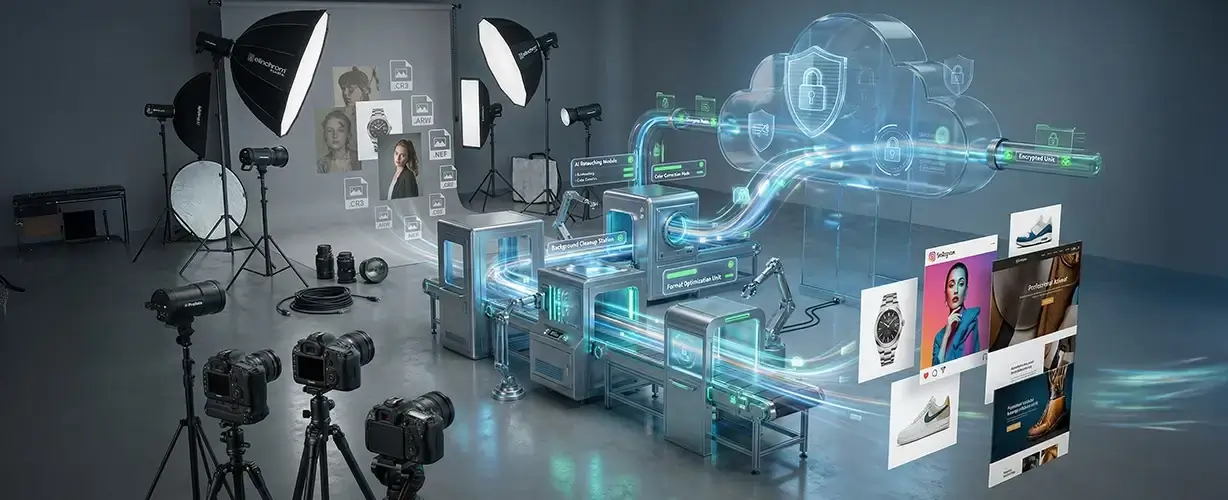
SmartPHOTOeditors and the Hybrid Workflow Advantage
To pull off this intensive 6-stage retouching workflow, you need a partner that can handle the heavy lifting so photographers, studios, and brands can stay focused on the people in front of the camera. Implementing such a complex portrait retouching workflow at scale and delivering under tight deadlines is where SmartPHOTOeditors (SPE) shines.
SPE offers professional photo portrait retouching services, including:
- More than 13 years of experience and 1000+ completed projects for clients around the world
- A team of over 200 skilled Adobe retouching specialists
- A smart mix of AI portrait photo editing services and human artistry for speed with real quality
- Fast delivery, often within 12 hours for portrait batches
- Secure cloud systems, NDA support, and encrypted file transfers
- Free revisions and bulk photo editing, scaling from 200 images to 20,000 and beyond
- White-label delivery for studios and agencies that want to keep everything under their brand
Result? You get high-volume portrait editing through our hybrid headshot retouching services that still feel personal, careful, and premium.
Common viewers may not notice any of these steps. They only feel that the person looks confident, fresh, and real. That is what makes a portrait well-edited: the edits disappear, and the person remains.
Retouching that Honors Reality
The best retouching is subtle. It brings back what the camera missed and cleans up what the eye never caught. With a solid workflow, every portrait feels more confident, more expressive, and truer.
Whether you are working on a few images or thousands, SmartPHOTOeditors helps maintain the quality and style so every person looks like their real best self. Reach out now and let us show you what your portraits can become.
FAQs
Which software/tools are best for professional portrait retouching?
Most pros use Adobe Lightroom and Adobe Photoshop together. Lightroom handles selection and basic adjustments. Photoshop gives control for skin work, dodge and burn, masking, and all fine details.
Can AI-powered retouching tools replace manual retouching completely?
AI can handle the repetitive clean-up jobs and save a lot of time, but human judgment is still needed to keep faces natural and true. The best work comes from AI and artists working together.
What mistakes should one avoid in portrait retouching?
Do not blur away skin texture, change a person’s features, or brighten teeth and eyes too much. Avoid edits that people can notice at first glance. Subtle work always looks more professional.
Is there a “one-size-fits-all” retouching workflow, or must the workflow adapt to portrait type?
There is a basic workflow that works for most portraits, but the style should always adapt to the purpose of the image. A LinkedIn headshot, a magazine portrait, and a school photo each need a different touch.
SmartPHOTOeditors
 Prev
Prev